
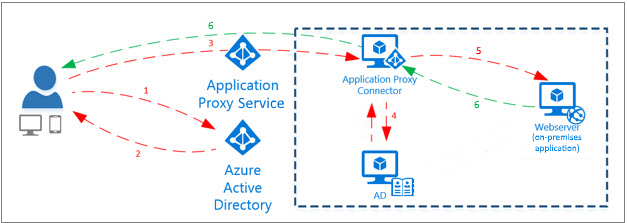
Ever wanted to offer a single sign experience to users who are not on domain joined clients? well now you can if they have an Azure account! The Azure Application Proxy is pretty cool actually and allows you to do a load of tricky things like pre-authentication, use shared accounts as if they were individual accounts, publish local app safely onto the tinterweb. The following walkthrough will show you how to publish the MIM portal through Azure Application Proxy (AAP). The same technique also works for the password registration portal. It’s very similar to the Web Application Proxy by Microsoft but its a lot simpler to setup and maintain and it doesn’t need ADFS (Yay!)
Get Started!
First lets get MIM using Kerberos only, now there are loads of guides out there but I will just summarize quickly.
Imagine your environment is:
MIM Portal URL: portal.mim.ninja (use an A record its just easier trust me)
MIM Service Account: MIMServ
SharePoint App Pool account: MIMSP
Domain: MIMNINJA
so SPN’s
On the MIMSP account add the SPNassuming tyou entered the correct portal address during installation check the web.config detailed below to check they HAVE to match:
http/portal.mim.ninja so do via ADUC or setspn -x http/portal.mim.ninja mimninja\MIMSP
On the MIMServ account:
FIMService/portal.mim.ninja or setspn -x FIMService/portal.mim.ninja mimninja\MIMServ
On the MIMSP account Set delegation to Kerberos only and select the MIMServ account and the select the SPN we just registered.
On the MIMServ account Set delegation to Kerberos only and select the MIMServ account and the select the SPN we just registered (it delegates to itself).
in the web.config file for your mim portal located at C:\inetpub\wwwroot\wss\VirtualDirectories\XX\web.config (xx being the port normally 80) change the line:
<resourceManagementClient resourceManagementServiceBaseAddress="http://portal.mim.ninja:5725" timeoutInMilliseconds="60000"/>
to
<resourceManagementClient resourceManagementServiceBaseAddress="http://portal.mim.ninja:5725" timeoutInMilliseconds="60000" requireKerberos="true"/>
This forces connections to the portal service to be Kerberos only.
In the file:
C:\Program Files\Microsoft Forefront Identity Manager\2010\Service\Microsoft.ResourceManagement.Service.exe.config
Make sure the following values match your portal address:
 <resourceManagementClient resourceManagementServiceBaseAddress="portal.mim.ninja" />
<resourceManagementService externalHostName="portal.mim.ninja" />
Now I’m not 100% sure whether the following change is absolutely required anymore, but what I do know is that it doesn’t break it so may be best to update it also:
Remove line 10 in C:\Windows\System32\inetsrv\config\applicationHost.config this stops fall-back to NTLM authentication:
    <location path="MIM Portal">
        <system.webServer>
            <handlers accessPolicy="Read, Execute, Script" />
            <security>
                <authentication>
                    <windowsAuthentication enabled="true" useKernelMode="false" useAppPoolCredentials="true">
                        <providers>
                            <clear />
                            <add value="Negotiate" />
                            <add value="NTLM" />
                        </providers>
                    </windowsAuthentication>
                    <anonymousAuthentication enabled="false" />
                    <digestAuthentication enabled="false" />
                    <basicAuthentication enabled="false" />
                </authentication>
            </security>
            <urlCompression doStaticCompression="true" doDynamicCompression="true" />
            <httpErrors existingResponse="PassThrough" />
            <httpProtocol>
                <customHeaders>
                    <clear />
                    <add name="X-Powered-By" value="ASP.NET" />
                    <add name="MicrosoftSharePointTeamServices" value="16.0.0.4327" />
                </customHeaders>
            </httpProtocol>
        </system.webServer>
    </location>
Now run iisreset and net stop/start fimservice and try and access your portal it should load ok if you get the generic fim service error then you would have got one of the steps wrong above, if it works ok you can run klist at a command prompt and you should see a Kerberos ticket for your portal url in our case portal.mim.ninja. You cannot go any further until KCD is working in the MIM portal.
Great so everything working using Kerberos? well lets go ahead and start to setup AAP…You will need:
A Microsoft Azure AD basic or premium subscription and an Azure AD directory for which you are a global administrator.
A server running Windows Server 2012 R2 or 2016, on which you can install the Application Proxy Connector. The server needs to be able to connect to the Application Proxy services in the cloud, and the on-premises applications that you are publishing.
For single sign-on to your published applications using Kerberos Constrained Delegation, this machine should be domain-joined in the same AD domain as the applications that you are publishing. For information, see KCD for single sign-on with Application Proxy.
Follow this guide to get started, I can’t be bothered pasting all the menial stuff! Come back here when you’re finished 😉
This last point is key for us we have just done it!
Follow the guide here until you get to the publish application part below:
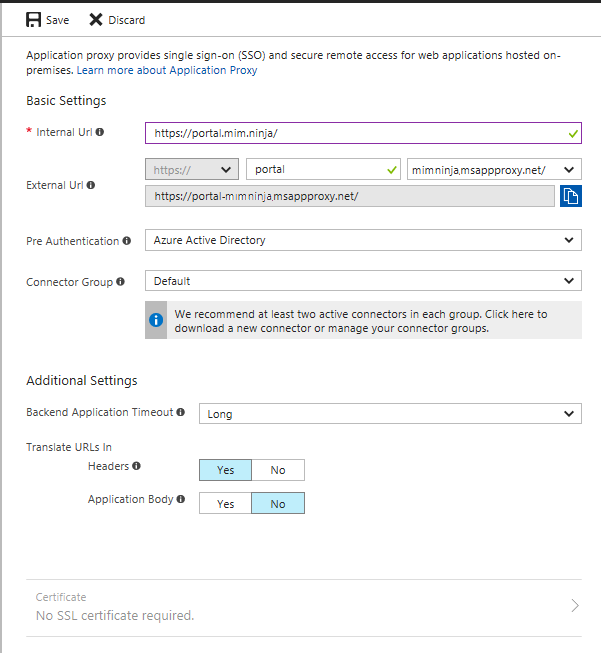
This how would be filled in for us, pick whatever url you like if its a custom domain it needs to be added to Azure to work and DNS updated accordingly but you are probably best getting it working first then changing the url later.
SSO
Now follow the guide again here and when you get to the configuring the Kerberos delegation on the AAP connector machine you would put in something like
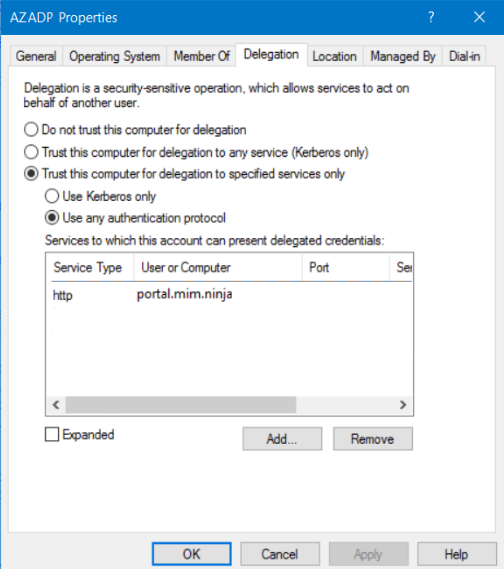
Make sure that use any authentication protocol is checked rather than Kerberos only.
Keep following the guide then make sure SSO config looks like below for our example:
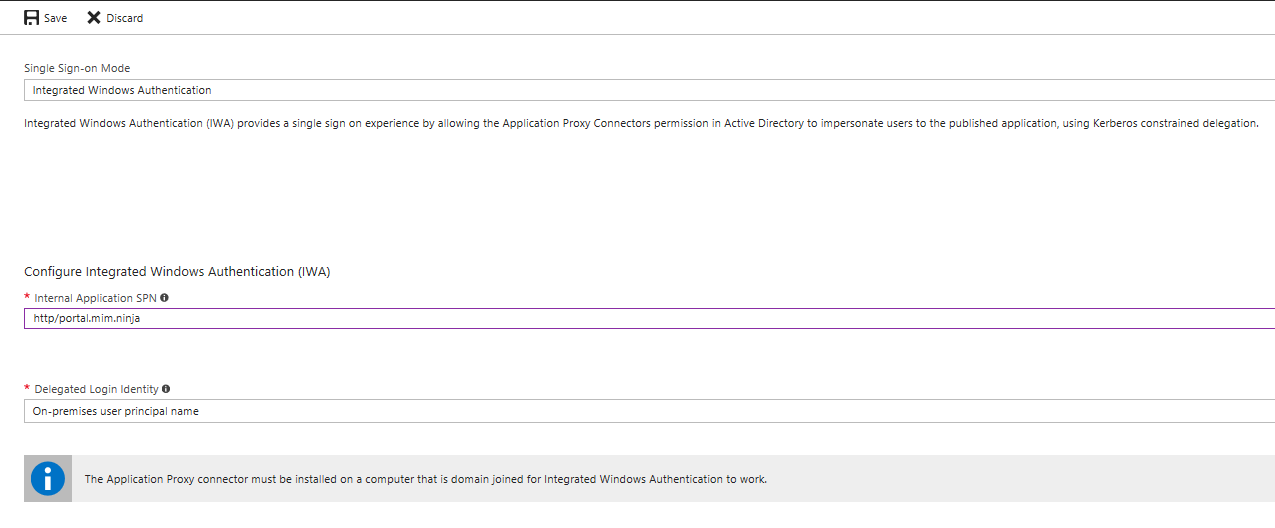
The delegated login identity will probably be the onsite UPN, obviously you users need an Onsite AD and an Azure AD accounts.
You can have your internal and external URL’s the same, you point your dns to the cname record it gives you on the config page the use your HOSTS file on the connector server to point to your internal portal.
That should be it you can configure conditional access and users and groups if you like or give access to the whole of Azure AD obviously only people with access to the portal will be able to access. Give it a go and experiment. Let me know any feedback!
Keep it Ninja!