Unable to read data from the transport connection…TLS/SSL Problems in MIM

Hey Yall…. Seems like MS are forcing TLS 1.2 or above on SMTP connections and other O365 web based authentication services that connect to Azure, if you get an error like:

System.Web.Services: System.Net.WebException: The underlying connection was closed: An unexpected error occurred on a send. —> System.IO.IOException: Unable to read data from the transport connection: An existing connection was forcibly closed by the remote host. —> System.Net.Sockets.SocketException: An existing connection was forcibly closed by the remote host
at System.Net.Sockets.NetworkStream.Read(Byte[] buffer, Int32 offset, Int32 size)

Then try applying these reg entries that force > TLS 1.2 connections on 32 bit and 64 bit .Net v2.0.50727 which is what the MIM portal users….the later versions seemed to be forced already. They also get applied as part of a hardening GPO but its name escapes me ATM.

[HKEY_LOCAL_MACHINE\SOFTWARE\WOW6432Node\Microsoft\.NETFramework\v2.0.50727]
"SystemDefaultTlsVersions"=dword:00000001
"SchUseStrongCrypto"=dword:00000001

[HKEY_LOCAL_MACHINE\SOFTWARE\Microsoft\.NETFramework\v2.0.50727]
"SystemDefaultTlsVersions"=dword:00000001
"SchUseStrongCrypto"=dword:00000001

MS have been phasing it on on SMTP connections via the term they call speedbump

MIM 2016: How to Run MIM Automation PowerShell Cmdlets on non-MIM Machines

My first post again in aaaaaages sorry about that guys but as the more astute of you have probably realised this is a rip off the Microsoft Page here

There is a lot of faff on that page and right at the bottom is the most important bit, the script and in true MS fashion with a typo in it, so here is the corrected version tweaked slightly and its all you need if you are on 64 bit windows which to be fair who isn’t?

You can also get the required files from the MIM ISO which in some cases is easier to get your hands on, they are located at
..\Service and Portal\Program Files\Microsoft Forefront Identity Manager\2010\Service. The script also doesn’t need the GACUTIL so you don’t have to waste time trying to find that if your system doesn’t have it already.

#Set dll location folder
$location = "C:\Install\FIMResourcemanagement"
cd $location
set-alias installutil $env:windir\Microsoft.NET\Framework\v2.0.50727\installutil
installutil .\Microsoft.ResourceManagement.Automation.dll
Set-location $location
[System.Reflection.Assembly]::Load("System.EnterpriseServices, Version=4.0.0.0, Culture=neutral, PublicKeyToken=b03f5f7f11d50a3a")
$publish = New-Object System.EnterpriseServices.Internal.Publish
$publish.GacInstall("c:\Install Microsoft.ResourceManagement.dll")
$publish.GacInstall("c:\Install\Microsoft.IdentityManagement.Logging.dll")

That’s all you need to get by…

The HTTP request is unauthorized with client authentication scheme ‘Basic’. The authentication header received from the server was ‘Basic realm=”SAP HANA Cloud Platform”‘.

In my line of work I quite often find myself connecting to Web Services to consume data, usually by SOAP or RESTful based services. They both have the good and bad points, the good points are that SOAP based exchanges usually come with a nice description of the contracts in the form of a WSDL file. However anything .net can be quite picky about how it digests these end points while a malformed or in-complete wsdl will quite happily be used by SoapUI or similar test suite, .net will struggle. Case in point if your bindings aren’t setup correctly, if you are not sure about the non-clemanture of WSDL files I suggest this as an old but good article to get you started.

I was getting the above error because I was not declaring my bindings properly, they weren’t mentioned at all in the WSDL so I suppose Visual Studio was behaving as expected, if they were they would have probably been declared in the app.config, I don’t like doing it there if I can help it though and prefer to do it programmatically. So, what I had to do was create bindings and past them with the configuration…..Something like this:

                Uri Address = new Uri("https://deadendpoint.com/pain");
                EndpointAddress EndPointAddr = new EndpointAddress(Address);
                //Create your binding this normally Basic for SOAP
                BasicHttpBinding Binding = new BasicHttpBinding();
                //If you have authenticate with HTTPS with username password we need to set Transport and Message Credential
                Binding.Security.Transport.ClientCredentialType = HttpClientCredentialType.Basic;
                Binding.Security.Mode = BasicHttpSecurityMode.Transport;
                Binding.Security.Message.ClientCredentialType = BasicHttpMessageCredentialType.UserName;
                //Instantiate Client with our binding and URI
                autoCreatedProxyClassClient ProxyClient = new autoCreatedProxyClassClient(Binding, EndPointAddr);
                //Specify Username-credential credentials
                ProxyClient.ClientCredentials.UserName.UserName = myUsername;
                ProxyClient.ClientCredentials.UserName.Password = myPassword;
                //Add request to field
                ProxyRequest.ProxyRequestField = ProxyDTRequest;

Publishing MIM Portal with Azure App Proxy

Ever wanted to offer a single sign experience to users who are not on domain joined clients? well now you can if they have an Azure account! The Azure Application Proxy is pretty cool actually and allows you to do a load of tricky things like pre-authentication, use shared accounts as if they were individual accounts, publish local app safely onto the tinterweb. The following walkthrough will show you how to publish the MIM portal through Azure Application Proxy (AAP). The same technique also works for the password registration portal. It’s very similar to the Web Application Proxy by Microsoft but its a lot simpler to setup and maintain and it doesn’t need ADFS (Yay!)
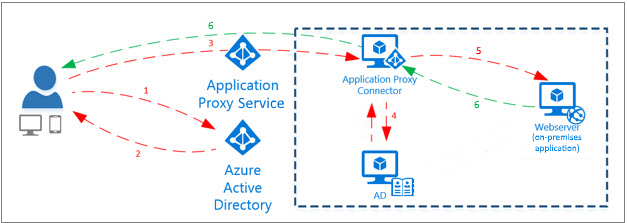
Overview

Get Started!

First lets get MIM using Kerberos only, now there are loads of guides out there but I will just summarize quickly.
Imagine your environment is:
MIM Portal URL: portal.mim.ninja (use an A record its just easier trust me)
MIM Service Account: MIMServ
SharePoint App Pool account: MIMSP
Domain: MIMNINJA

so SPN’s
On the MIMSP account add the SPNassuming tyou entered the correct portal address during installation check the web.config detailed below to check they HAVE to match:
http/portal.mim.ninja so do via ADUC or setspn -x http/portal.mim.ninja mimninja\MIMSP

On the MIMServ account:
FIMService/portal.mim.ninja or setspn -x FIMService/portal.mim.ninja mimninja\MIMServ

On the MIMSP account Set delegation to Kerberos only and select the MIMServ account and the select the SPN we just registered.
On the MIMServ account Set delegation to Kerberos only and select the MIMServ account and the select the SPN we just registered (it delegates to itself).

in the web.config file for your mim portal located at C:\inetpub\wwwroot\wss\VirtualDirectories\XX\web.config (xx being the port normally 80) change the line:

  <resourceManagementClient resourceManagementServiceBaseAddress="http://portal.mim.ninja:5725" timeoutInMilliseconds="60000"/> 

to

 <resourceManagementClient resourceManagementServiceBaseAddress="http://portal.mim.ninja:5725" timeoutInMilliseconds="60000" requireKerberos="true"/>

This forces connections to the portal service to be Kerberos only.

In the file:
C:\Program Files\Microsoft Forefront Identity Manager\2010\Service\Microsoft.ResourceManagement.Service.exe.config

Make sure the following values match your portal address:

 <resourceManagementClient resourceManagementServiceBaseAddress="portal.mim.ninja" />
<resourceManagementService externalHostName="portal.mim.ninja" />

Now I’m not 100% sure whether the following change is absolutely required anymore, but what I do know is that it doesn’t break it so may be best to update it also:
Remove line 10 in C:\Windows\System32\inetsrv\config\applicationHost.config this stops fall-back to NTLM authentication:

    <location path="MIM Portal">
        <system.webServer>
            <handlers accessPolicy="Read, Execute, Script" />
            <security>
                <authentication>
                    <windowsAuthentication enabled="true" useKernelMode="false" useAppPoolCredentials="true">
                        <providers>
                            <clear />
                            <add value="Negotiate" />
                            <add value="NTLM" />
                        </providers>
                    </windowsAuthentication>
                    <anonymousAuthentication enabled="false" />
                    <digestAuthentication enabled="false" />
                    <basicAuthentication enabled="false" />
                </authentication>
            </security>
            <urlCompression doStaticCompression="true" doDynamicCompression="true" />
            <httpErrors existingResponse="PassThrough" />
            <httpProtocol>
                <customHeaders>
                    <clear />
                    <add name="X-Powered-By" value="ASP.NET" />
                    <add name="MicrosoftSharePointTeamServices" value="16.0.0.4327" />
                </customHeaders>
            </httpProtocol>
        </system.webServer>
    </location>

Now run iisreset and net stop/start fimservice and try and access your portal it should load ok if you get the generic fim service error then you would have got one of the steps wrong above, if it works ok you can run klist at a command prompt and you should see a Kerberos ticket for your portal url in our case portal.mim.ninja. You cannot go any further until KCD is working in the MIM portal.

Great so everything working using Kerberos? well lets go ahead and start to setup AAP…You will need:

A Microsoft Azure AD basic or premium subscription and an Azure AD directory for which you are a global administrator.
A server running Windows Server 2012 R2 or 2016, on which you can install the Application Proxy Connector. The server needs to be able to connect to the Application Proxy services in the cloud, and the on-premises applications that you are publishing.
For single sign-on to your published applications using Kerberos Constrained Delegation, this machine should be domain-joined in the same AD domain as the applications that you are publishing. For information, see KCD for single sign-on with Application Proxy.
Follow this guide to get started, I can’t be bothered pasting all the menial stuff! Come back here when you’re finished 😉

This last point is key for us we have just done it!
Follow the guide here until you get to the publish application part below:
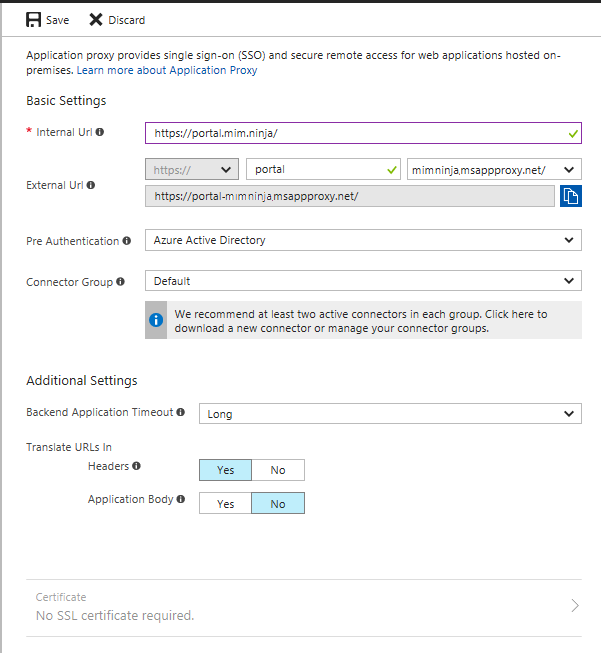
This how would be filled in for us, pick whatever url you like if its a custom domain it needs to be added to Azure to work and DNS updated accordingly but you are probably best getting it working first then changing the url later.

SSO
Now follow the guide again here and when you get to the configuring the Kerberos delegation on the AAP connector machine you would put in something like
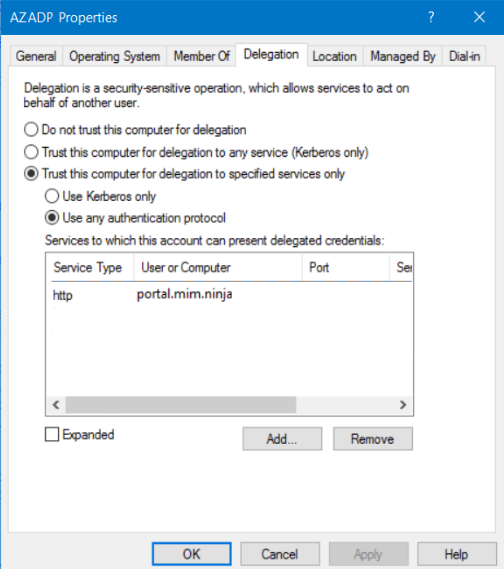
Make sure that use any authentication protocol is checked rather than Kerberos only.
Keep following the guide then make sure SSO config looks like below for our example:
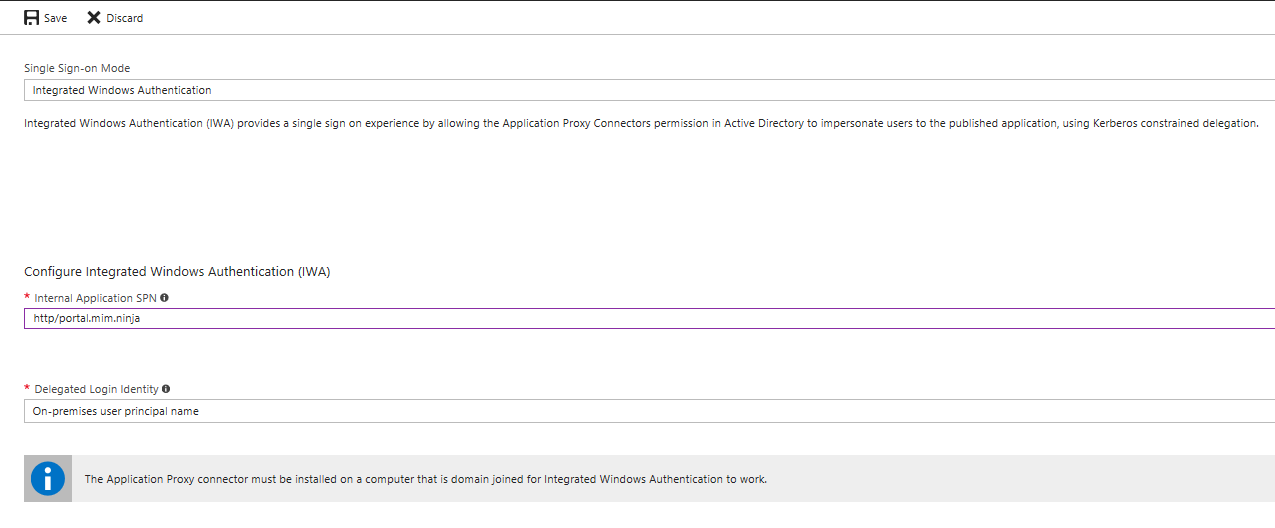
The delegated login identity will probably be the onsite UPN, obviously you users need an Onsite AD and an Azure AD accounts.

You can have your internal and external URL’s the same, you point your dns to the cname record it gives you on the config page the use your HOSTS file on the connector server to point to your internal portal.

That should be it you can configure conditional access and users and groups if you like or give access to the whole of Azure AD obviously only people with access to the portal will be able to access. Give it a go and experiment. Let me know any feedback!

Keep it Ninja!

Nodes in a load balancer cannot connect to themselves MIM/FIM service fails

Another interesting caveat in an Azure Load Balancer configuration if you have a say a Load Balanced server address of portal.mim.ninja and that within the fim service configuration and web.config you have the dns record portal.mim.ninja you will probably find this doesn’t work in an Azure portal configuration. You will get service unavailable page and the event of:

The Portal cannot connect to the middle tier using the web service interface. This failure prevents all portal scenarios from functioning correctly.

The cause may be due to a missing or invalid server url, a downed server, or an invalid server firewall configuration.

Ensure the portal configuration is present and points to the resource management service.

This is fixed by adding an entry to the hosts file of portal.mim.ninja with the servers own ip address…

But why is this happening?

Well, when the server send a syn packet out it expects a synack packet back but it gets sent its own syn back, which it doesn’t like and keeps sending this out…why this behaviour only seem to happen on the default MS Azure Load Balancer I’m not sure…but it does. So the workaround is modifying hosts as above this will however only ever use the service instance on that server but the actual connection will will be load balanced so it shouldn’t cause any problems.

Azure Load Balancer client Session Persistence setting for FIM/MIM

Since Azure is becoming more and more relevant when it comes to deployment solutions I thought I would give a quick overview on the settings to enable FIM/MIM portals to work ok behind an Azure NLB. Most of the settings are straightforward, load balance ports 80,443,5725,5726

Now 80 may or may not be needed if you are using my redirect script they are needed even though no client actually connects on port 80 the redirection needs to occur so the port needs to be open for the initial redirection.

5725 and 5726 are used by the FIM Service now as stated in the very succinct MS article on Load Balancers Here it explains that there needs to be client affinity between these 2 ports:

For password reset client it is important as well to keep session on the same server across the ports 5725 and 5726.
Why is that?
Simply because when password reset client connect to the QA gate and after successful user identification gets token from the Security Token Service on the 5126 port it has to request for password reset thru the Resource Management Service on the same server (but on the port 5725). If it will go to different server password reset will be unsuccessful.

Ok so what is that setting in Azure there is no “Sticky” term? well Azure LB uses tuples to work out which server to load balance the request to its explained well here.

But in essence

None:
5 tuple hash destination is based on Source ip, Source port, Destination ip, Destination port, Protocol
A good distribution so the client will only stay on the same server if all the above remain the same

ClientIP,Protocol:
3 tuple hash Source ip, Destination ip, protocol
Less distribution, connection will remain on same server if source ip and destination ip and protocol remain the same

ClientIP:
2 tuple hash Source IP dest IP
The least distribution affinity will remain as long as source and destination ip don’t change

So for FIM/MIM we need to setup ClientIP will will ensure the connection doesn’t jump between nodes when the protocol changes from 5725 to 5726…..

Make sure you check out my other posts for potential caveats:
Here and here.

FIM/MIM times out or SSL connection error behind Azure Load Balancer

Recently I had been setting up a load balanced MIM Portal solution in the Azure cloud and the setup seemed to work ok, after a while I got reports it was working for some people. It turned out if you were connected via WIFI it worked fine but if you connected via LAN it didn’t…….How bizarre! All the networks, gateways and site to site VPN’s were setup correctly and indeed if you tried to access any of the portal servers directly it worked only access via the Load Balancer was problematic.

The solution ended up being the setting “Large Send Offload” and I will explain why…

I collected the traces both on the Azure Server and my client pc. Initially I saw the 3-way handshake was successful, which means the port is opened and packet is reaching the backend VM. I then noticed that to complete SSL handshake, my client PC sends Client Hello, but never receives Server Hello.
then the Azure Server logs were checked, I noticed that the Server Sends Server hello but with a payload larger than 1350 MTU……but why is that a problem?

Below is the architecture

Azure Server –> Load balancer –> Azure gateway–> Source client PC

When the Azure Sever sends payload greater than 1350 , the Azure gateway sends the Destination Unreachable message to the Load balancer. Stating that it should decrease the Payload and send it again. The Destination Unreachable message is sent to Load balancer, but the load balancer never sends to the Backend VM, because it never knows the packet is for the particular target VM. It always thinks that the packet is for itself. Due to which the target backend VM never reduces the payload and subsequently doesn’t re-send it to the gateway.

Finally the Solution!

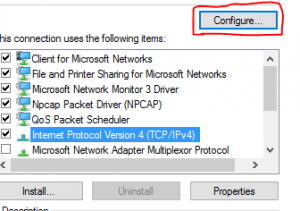
• Go to the Network adaptor
• Go to properties
• Click on configure

• Go to Advanced option and Disable the below 2 options

Disable the “Large Send Offload”
Check the status of “Jumbo frames” also but this usually disabled by default anyway

After disabling those settings everything started working apparently this mechanism is by design, can only be resolved by disabling the above 2 features. Apparently Microsoft are working on making the Azure Load Balancers accept and forward large packets.

Installing FIM Automation PowerShell cmdlets

We all need to install FIM Automation cmdlets on different server/client at some stage, why on earth Microsoft didn’t make this easier I will never know. But again in true Ninja fashion I have automated the install in PowerShell……Peep this!

#Make sure the Microsoft.ResourceManagement.dll, Microsoft.ResourceManagement.Automation.dll and the Microsoft.IdentityManagement.Logging.dll are all in the current directory.
set-alias installutil $env:windir\Microsoft.NET\Framework\v2.0.50727\installutil
installutil .\Microsoft.ResourceManagement.Automation.dll
$installdir = "C:\Install"
Set-location $installdir
[System.Reflection.Assembly]::Load("System.EnterpriseServices, Version=4.0.0.0, Culture=neutral, PublicKeyToken=b03f5f7f11d50a3a")
$publish = New-Object System.EnterpriseServices.Internal.Publish
$publish.GacInstall($installdir + "\Microsoft.ResourceManagement.dll")
$publish.GacInstall($installdir +"\Microsoft.IdentityManagement.Logging.dll")
#The following lines remove the MIM dll's out of the GAC if required at some later stage.
#$publish.GacRemove($installdir + "\Microsoft.ResourceManagement.dll")
#$publish.GacRemove($installdir +"\Microsoft.IdentityManagement.Logging.dll")

Disable LoopBack Check

Common problem with deployments on SharePoint is that when you try to browse to the server loopback on any dns name that isn’t the server name itself the server will stop you and it looks like a Kerberos error initially. To disable these checks can be done easily and in true Ninja fashion by PowerShell script….check it out:

The first option is more secure as you only grant access to the host names specified, the second option gives access to the server on any hostname so is less secure.


New-ItemProperty HKLM:\SYSTEM\CurrentControlSet\Control\Lsa\MSV1_0 -Name BackConnectionHostNames -Value "password.mim.ninja","portal.mim.ninja" -PropertyType MultiString -Force

New-ItemProperty HKLM:\System\CurrentControlSet\Control\Lsa -Name "DisableLoopbackCheck" -value "1" -PropertyType dword


You can have as many host names as you like in the first script, MS recommends only using the 2nd option in development environments.

WordPress Appliance - Powered by TurnKey Linux